Showing posts with label Adobe InDesign CC. Show all posts

Tuesday, August 21, 2018

Preserve Layers and Vectors

Photoshop can do both vector and bitmap image processing. However, when you import Photoshop vector shapes into InDesign, you will find that the vector path information is lost. As a result, any text that you have created in Photoshop, will become rasterized when you import into InDesign and can lead to low quality prints.
The best way to avoid this situation is to save the original Photoshop image as a PDF file instead of PSD.
However, you should remember that saving as a PDF causes Photoshop to discard layer information. Hence, when you add or remove layers from the original file, it might not reflect in your InDesign document. Again, the best workaround for this is to use Illustrator .ai files. Layer information is preserved in .ai files much better.
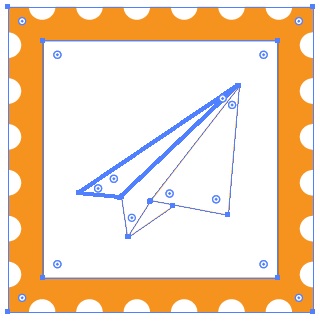
In the following example, we see that there is no loss of information in the imported PDF file as the vector information is preserved, when the file is saved as PDF in Photoshop.
PDF in Photoshop

Export InDesign Artwork

Just like it is easy to import PSD and AI files into InDesign, it is also easy to export InDesign artwork into either of these programs. The simplest method to do this is copy and paste. The procedure is the same for both the programs but keep in mind that the objects’ paths in InDesign are more appropriately imported into Illustrator to retain the vector paths rather than in Photoshop. Photoshop rasterizes the image so you are left with fewer editing options.
It is always recommended to first import the InDesign artwork into Illustrator and then take it from Illustrator to Photoshop.
To copy the InDesign artwork, simply select the desired objects using the Selection tool and press Ctrl+C on Windows or Command+C on the Macto copy the objects to the clipboard.
Copy to Clipboard
Create a new Illustrator document and press Ctrl+V on Windows or Command+V on the Mac to paste the InDesign artwork. You will notice that all the vector paths are carried over to the Illustrator document and you are also able to scale freely without loss of resolution.
However, while pasting the same artwork in Photoshop, you will see that there is loss of resolution and the image gets rasterized. It is still pasted as a vector smart object but in order to change the paths, you need to go back to Illustrator, change the paths, save the file and come back to Photoshop.
Photoshop Object
Therefore, it is always recommended to import InDesign artwork into Illustrator than Photoshop. If you must use Photoshop, then import it into Photoshop via Illustrator but never paste directly.

Photoshop amd Illustrator Workflows

Using Adobe Photoshop and Adobe Illustrator along with InDesign generally completes the creative workflow for most people. All these programs interact well with each other and you might find yourself constantly juggling between these three programs.
InDesign makes it easy to move between all three of them. However, instead of just selecting your image and copy pasting between Photoshop or Illustrator and InDesign, there are some rules to follow.

Importing Images from Photoshop

Photoshop is a bitmap raster image program which means that images can lose or gain resolution with scaling. Most of the images we deal with daily are raster image formats. Images that are able to maintain native resolution no matter the scaling are called vector images which are the kind of images that Illustrator deals with.
The most important thing to remember when integrating Photoshop with InDesign is the file format that you choose to work with. JPEGs are the default and are fine with most cases but if you want to have high quality images, layer, and transparency information, JPEGs are not the ones you should be using. Photoshop supports literally almost all the image formats there is but the best choice remains the Photoshop format, also known as PSD.
Photoshop Format
When you work with an image in Photoshop, you might want to include transparency information or isolate the foreground from the background in another layer. Importing this transparency image or alpha channel will help the object to blend easily with the rest of the document when you import it into InDesign.
Always use the Place command instead of simply copy and paste to have more flexibility on your imports.
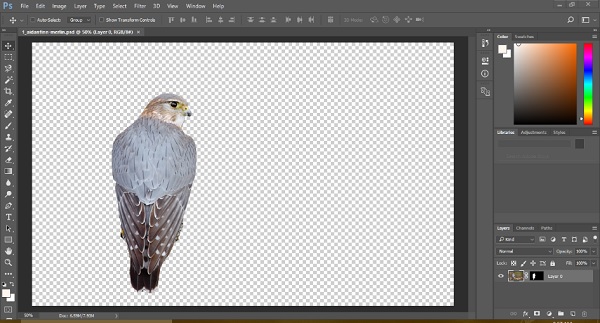
In the following example, we see that there is a transparency layer behind the bird which has been created in Photoshop and saved as a native PSD file.
We can now use the Place command to place the image of the bird directly in the InDesign document. Make sure that the Show Import Options checkbox is checked.
Image import Option
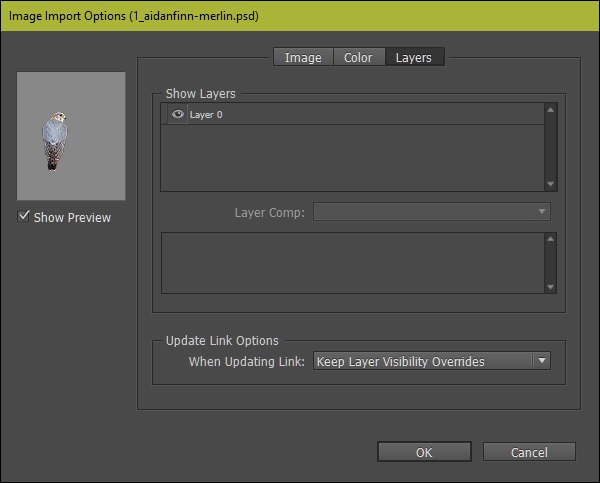
This will open the Image Import Options dialog box.
This dialog box will allow you to select which layer of the image you want to import and also allows you to select the transparency layer. Here it shows the preview of the bird. We can go ahead and import it by pressing OK.
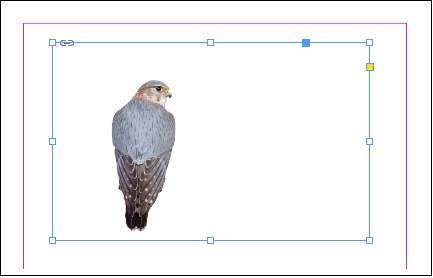
This will reveal the Place cursor with the image. Simply drag a frame with the Place cursor to place the image in the frame.
Drag Frame
If you have clipping paths in your original Photoshop image, you can select the clipping paths or the alpha channel while importing the image. It is always better to go with the alpha channel to ensure anti-aliasing and smooth blending.

Importing Images from Illustrator

Importing Illustrator files is a little tricky. Similar to Photoshop, you need to save the Illustrator drawing in a compatible format before InDesign can make sense of it. The best formats suited for this are native Adobe Illustrator (.ai)files and Adobe PDF (.pdf) files. InDesign does not yet have support for import Scalable Vector Graphics (.svg) files so if you have .svg files that you want to work with, you might want to save them as .ai or .pdf from Illustrator before importing them into InDesign. Try to avoid .eps files as much as possible.
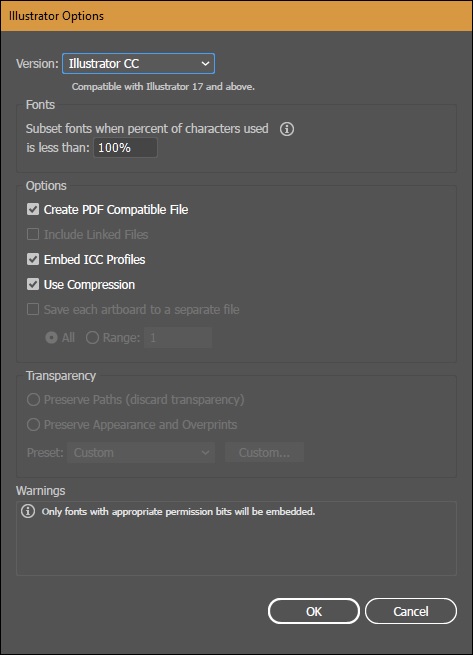
When you save the file as a .ai file, the Illustrator Options dialog box opens. Be sure to check the Create PDF Compatible File in the Options section otherwise InDesign will not be able to read the .ai file.
Illustrator Option
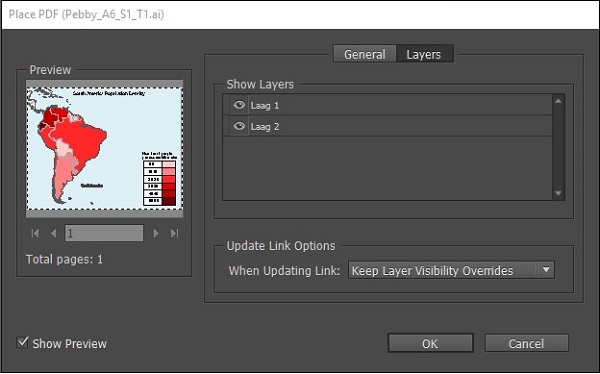
Now, use the Place command in InDesign. This will open the Place PDF dialog box (remember that the PDF is embedded within the .ai file) if the Show Import Options dialog box is checked when using Place or you can also hold down the Shift key when using Place. Here, you can choose which layers you want to import and click OK.
Place PDF
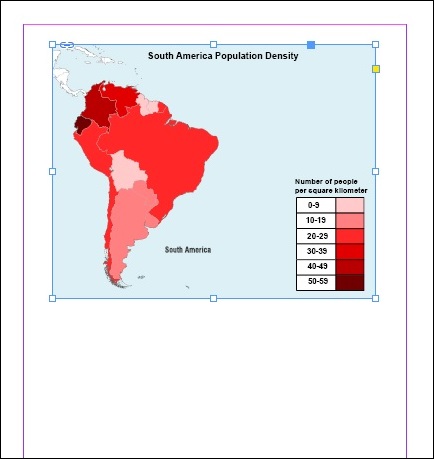
You will see the Place cursor on the InDesign document. Drag a frame to place the vector art within it.
Vector Art

Adobe InDesign CC - Word to InDesign

Retaining Formatting Overrides

The advantage of using the Place command over simple cut and paste is that you can choose to strip off formatting but just keep the overrides or modifications to the style which you can then further tune in InDesign. When importing, using the Place command make sure that Show Import Optionscheckbox is checked.
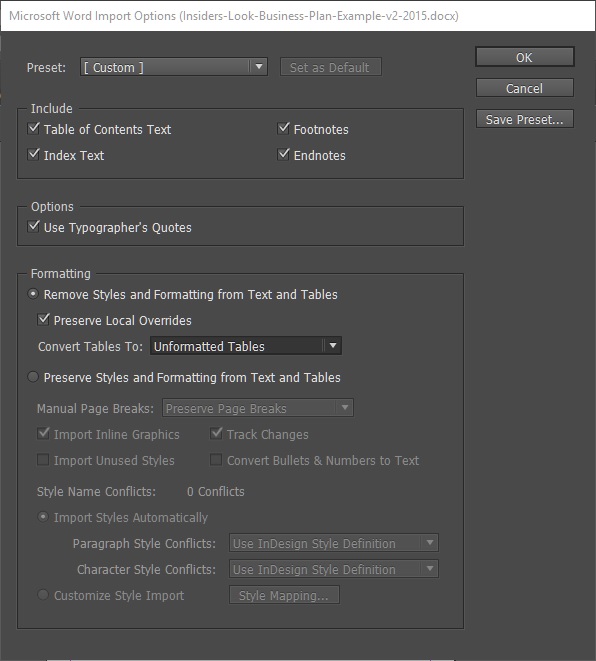
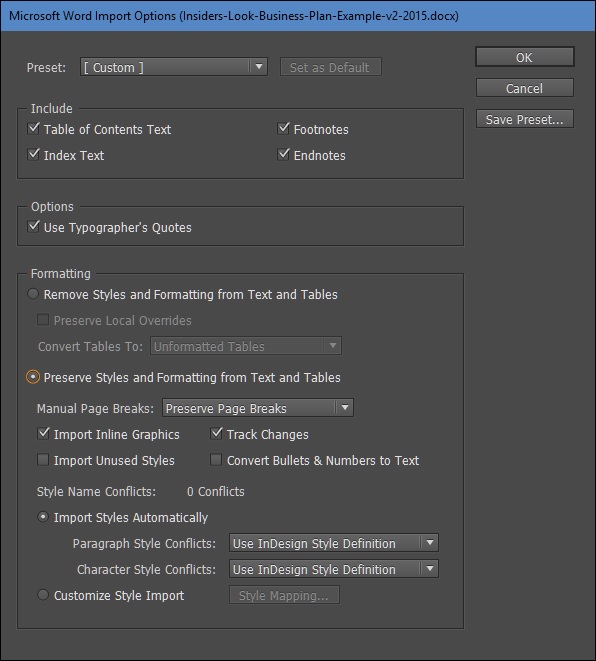
In the Microsoft Word Import Options dialog box, ensure that the radio button, Remove Styles and Formatting from Text and Tables in the Formatting section is selected and the Preserve Local Overrides checkbox is checked. This will ensure removal of all Word styles but will preserve font overrides such as bold, italics, etc. when importing into InDesign.
Show Import Options
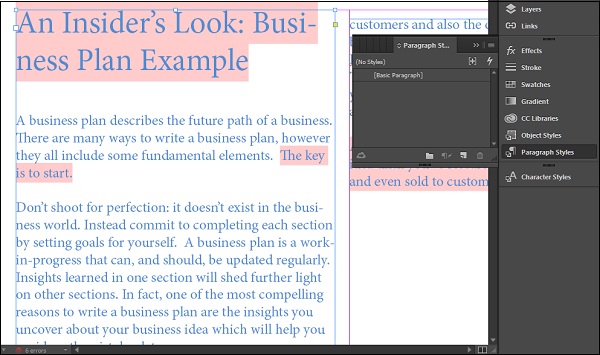
You will see that InDesign has imported the Word document without any of the formatting styles but retained font overrides such as bold, italics, etc.
Retaining Overrides
The Paragraph Styles panel shows Basic Paragraph which means all the style of the document is now InDesign default.
From here, you can choose to apply any paragraph or character style in InDesign.

Style Mapping

Style mapping is useful if you want InDesign to correlate the Word styles in your imported document into styles that InDesign can understand. You can map both paragraph and character styles so that when you import the document, the mapped styles are applied automatically.
While importing using the Place command, make sure that Show Import Options checkbox is checked.
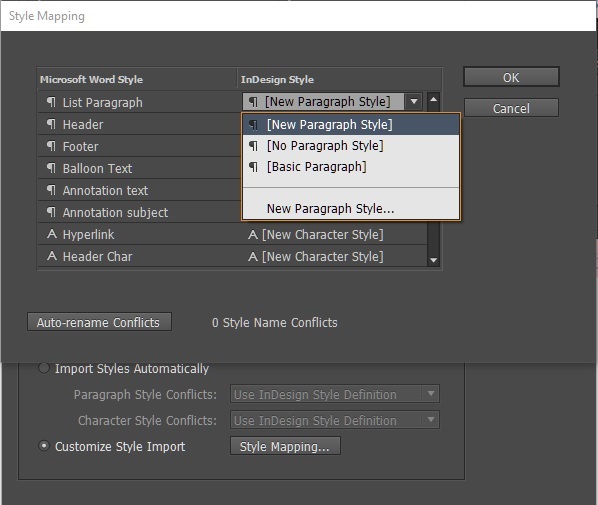
In the Microsoft Word Import Options dialog box, ensure that the radio button, Preserve Styles and Formatting from Text and Tables in the Formatting section is selected. Then at the end of the Formatting section, make sure that the Customize Style Import radio button is selected and then click Style Mappingto open the Style Mapping dialog box.
Style Mapping
The Style Mapping dialog box shows two columns − on the left is the Microsoft Word style which is present in the Word document that you are importing and on the right is the InDesign style that you want to apply correspondingly.
There are both paragraph and character styles shown (denoted by the paragraph symbol and A symbol respectively) and for each Word style, you can choose the available InDesign style by clicking the down arrow beside each InDesign style.
Once you are done, click OK and OK again to import the Word document with the required formatting.

Word File Import to InDesign

The Place command in the File menu lets you import a Word file into InDesign. In the Place dialog box, make sure that Show Import Options checkbox is checked.
In the Microsoft Word Import Options dialog box, ensure that the radio button, Preserve Styles and Formatting from Text and Tables in the Formatting section is selected. This will ensure translation of most of the Word styles into InDesign.
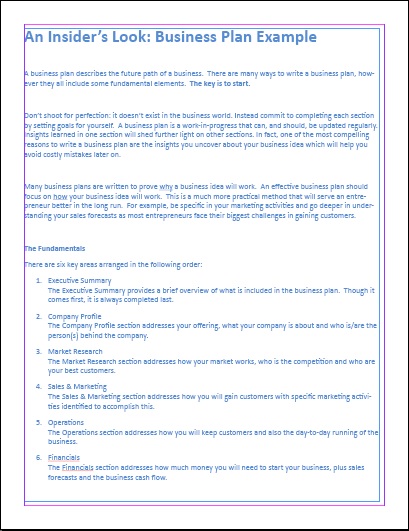
Word File Into InDesign
Click OK to get the Place cursor in your InDesign document and drag to draw a text frame and place the Word document inside the text frame.
Most of the Word formatting does indeed carry over into InDesign. Things such as bullets and numbering, basic font settings, leading and paragraph styles do carry over just fine.
However, things such as WordArt, highlights, overridden Word styles and image formatting might not carry over well.
Tables carry over well but you might need to readjust the row and column sizes.
Readjust Sizes

Adobe InDesign CC - Word and InDesign

Using Microsoft Word and Adobe InDesign together is possible and can be an important part of your workflow. There are fundamental differences in how Word and InDesign function. Word is a word processor at its core. It has all the features you need to create elegant as well professional documents comprising mainly of continuous text. InDesign is a page layout program, which can also process text. The primary function of InDesign is to layout page elements and have better control over your document.
Of course, you do not normally use InDesign to write letters or essays and the users normally juggle between these two programs. Understanding these two programs begin with knowing how they handle text.
Word has paragraph and character styles as well which you can find in the Styles panel in the Home tab on the Office ribbon. By default, all formatting in the text apart from headings and titles, goes into the Normal style.
Character Normal Style
In InDesign as we have been seeing till now, each text frame or even parts of the text by default is grouped under the Basic Paragraph style. However, this offers a lot of customizations and font options that is not normally dealt in Word. Knowing this difference is important when you want to import text formatted with Word styles into InDesign.
You should also remember that in Word, you directly work with text in a blank document but in InDesign everything happens in frames. You cannot just type directly on a blank document without creating a text frame.
Another point to be aware of is, the color scheme used in Word is RGB, while in InDesign it can be either RGB or CMYK depending on the intent of the document.

Selective Text Frame Export

Sometimes, you might not want to export the whole document but only the text in selected text frames. InDesign makes it easy and offers you choices into the formats that you can export. We will explore two methods here, one is by using the Export command and the second by running scripts.

Exporting Text From a Frame Using the Export Command

We have used the Export command earlier to export files as PDFs. When you want to export just the text from a text frame, make sure the text cursor is inside the text frame and go to the File menu and click Export… You will now have a few additional choices.
Adding Additional Choice
The three main formats for exporting text are Text Only (.txt), Rich Text Format (.rtf) and Adobe InDesign Tagged Text (.txt). Text Only is a simple text format devoid of any formatting. It just exports the plain text. Rich Text Format allows for basic formatting and can be read by many word processors such as Microsoft Word.
Adobe InDesign Tagged Text format allows you to export the text with all the available InDesign formatting embedded in it. But it can only be read by other InDesign programs and not by any other word processor. This is useful if you are exporting text to work on another workstation with InDesign installed.

Exporting Text Using Scripts

InDesign is a very flexible program and its functionality can be extended by small snippets of code called scripts which are custom written to enhance the program’s functionality. InDesign can read scripts written in JavaScript (.jsx; Windows and Mac), AppleScript (.scpt or .as; Mac only) or Visual Basic scripts (.vbs; Windows only).
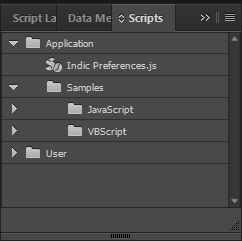
InDesign comes with some built-in scripts, which can be accessed by going to the Window menu, then to the Utilities submenu and selecting Scripts. This opens the Scripts panel, which lists all the available scripts on the computer.
There are two levels of scripts in the Scripts panel − Application and User. Application lists all the scripts that come with InDesign out of the box. It contains sample scripts in JavaScript along with VBScript (if on Windows) or AppleScript (if on the Mac). User lists all scripts that are installed by the user. You can locate these scripts on your hard drive by right-clicking on either the script or the parent folder and selecting Reveal in Explorer on Windows or Reveal in Finder on the Mac.
Reveal In Finder
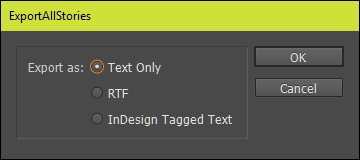
For exporting all the text from text frames, expand the Samples folder under the JavaScript folder, which is under Application and scroll down till you see the script named ExportAllStories.jsx. Double-click to run the script. This will open a dialog box asking you to select the export text format.
Exporting Text
As described earlier, select the desired format according to your needs and click OK to select a destination to save the file. The script works in the background and saves the exported file in the specified destination.

Export Documents as PDFs

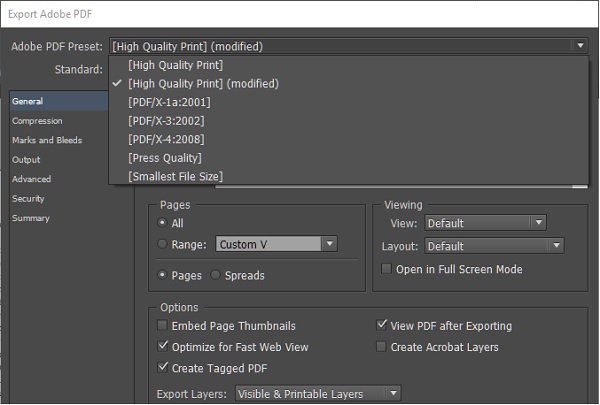
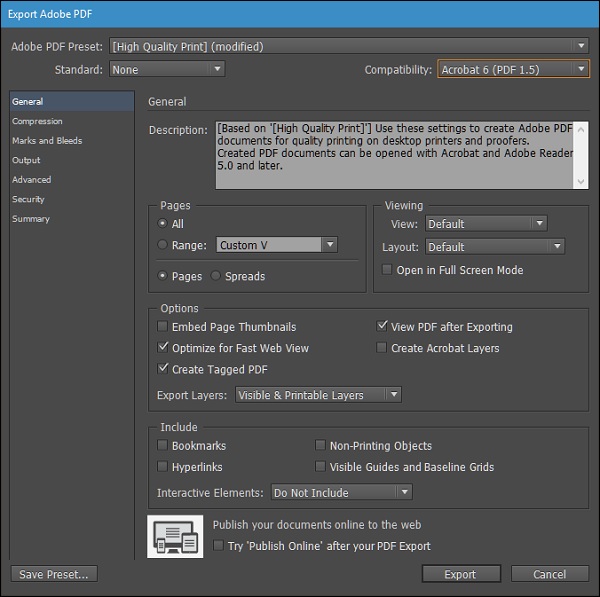
Exporting PDFs is very easy with InDesign. Just go to the Export dialog box from the File menu and select where you want to save the PDF. The Export Adobe PDF dialog box gives you a lot of presets to choose from right out of the box.

Selecting the Right Preset

If you click the Adobe PDF Preset dropdown menu, you will see that there are a lot of PDF format options available. The most used include PDF/x-1a (for North America) and PDF/x3a (for Europe). You might have to consult with your printing press before deciding on the format.
If your printing press supports it, select the PDF/x-4 for even more control over things such as transparency and a wider color gamut. For all other purposes, including on-screen ones, it is recommended to use the High Quality Print preset. It is better to avoid the Smallest File Size preset as much as possible as it can affect the resolution and colors of the images to reduce the file size.
PDF Right Preset
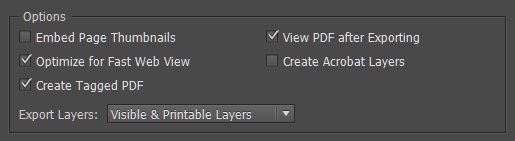
When you set the Compatibility to Acrobat 6 (PDF 1.5) or higher, you get the option to Create Tagged PDF in the Options section of this dialog box. This function allows you to tag keywords in the PDF, which makes indexing by search engines possible. It also allows for accessiblity options for the disabled as screen reader software can read the tagged data in the PDF.
PDF Options

Compression Options

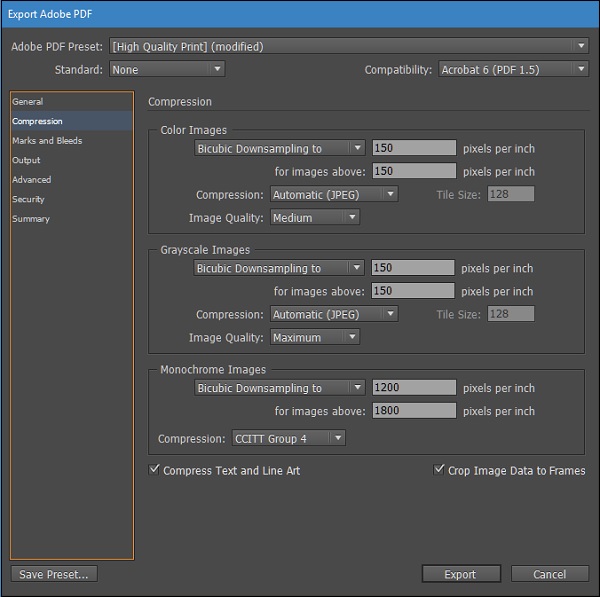
You can determine the amount of compression that InDesign should use while exporting the PDF. It has a large impact on the resulting file size and also on how well the PDF renders for the web. If you are simply displaying the document for the web, a lower pixel per inch (ppi) value would suffice. If you intend to have a high quality printout, then you need a higher ppi. The compression options can be accessed from the Compression section of the Export Adobe PDF dialog box.
Compression Options
For exporting to the web, in the Color Images section, set the Bicubic Downsampling to box to about 150 and the Image Quality to Medium. Do the same for the Grayscale Images section as well if your document has grayscale images.

Output Options

In the Output section of the Export Adobe PDF dialog box, you might want to review the settings in the Color area.
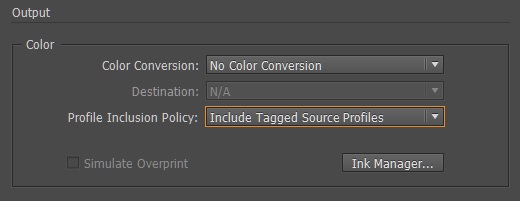
If you are going to view the PDF on-screen, it is better to leave the defaults as such and make sure that Include Tagged Source Profiles is selected in the Profile Inclusion Policy. This ensures that all images are a part of this PDF. This applies to only the RGB colors.
Output options
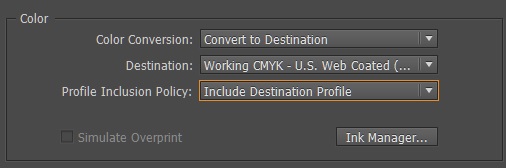
If you are printing, you need to change the Color Conversion option to Convert to Destination and select one of the different destination types, which are about the type of printed paper, in the Destination dropdown menu.
Color Conversion

Security Options

A PDF being one of the most commonly used document exchange format, can be vulnerable if you are sharing sensitive data. It is always advisable to password protect your PDF file to ensure confidentiality of information.
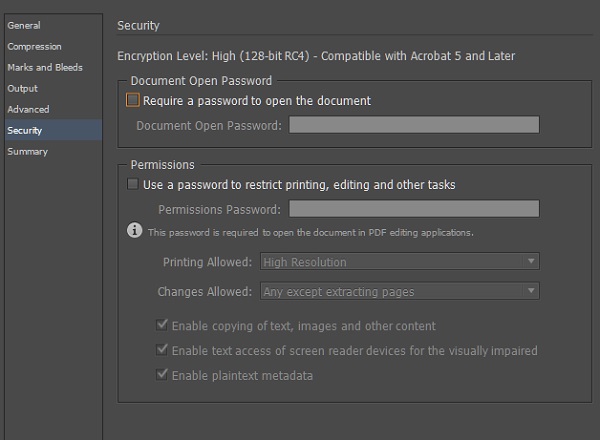
In the Export Adobe PDF dialog box, go to the Security section and select the Require a password to open the document checkbox and enter a password. Only those who know the password can open the PDF.
You can also use passwords for conditional restrictions. You can select what a user can or cannot do when he/she opens the document. The earlier password protection feature restricts access to the entire document. Here, you can specify the tasks the user has permission for.
For example, you can prevent the document from printing in low resolution or high resolution or even from printing at all. You can even prevent users from copying the content of the document to the clipboard, commenting, and extracting specific pages or even filling forms and signing. This is perfect if your sharing highly sensitive information with colleagues or outsiders.
Security Options

Print Documents and Booklets

Printing Documents

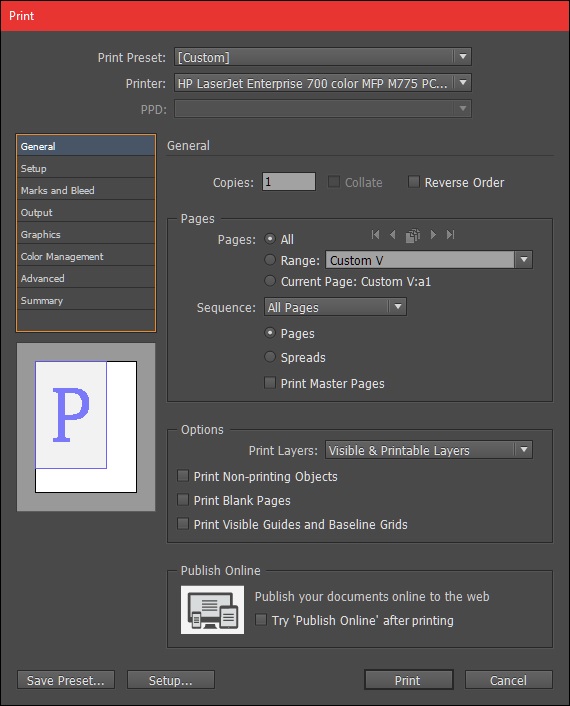
Printing documents is easy with InDesign. To print a document, go to the File menu and select Print… This will open the Print dialog box which gives you a lot of fine control over the printing.
The bottom left of the box shows a preview of the document and how it fits into the printed page. The Setup group allows you to set options such as page orientation, page size, position of the content, etc.
Print Setup
It would be a good idea to set all the possible and required print options in this dialog itself if the same options are available in your printer driver as well. Doing so will avoid a lot of potential conflicts between InDesign and your printer driver.
The Marks and Bleed group allows you to print the bleed and slug marks, the color bar, crop marks, etc. which can be useful but not necessary.
Depending on your printer, you might want to change the print output in the Output group to Composite RGB, Composite Gray or Composite CMYK. Generally, for home inkjet printers, Composite RGB or Composite Gray will do. Anything above that, it is always recommended to use Composite CMYK.
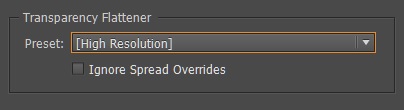
An important thing to note before high quality printing is to go to the Advanced group and select the High Resolution preset in the Transparency Flattener area.
High Resolution
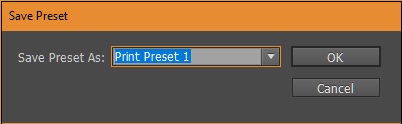
You can also save all these settings as a preset so that you can recall them whenever you want.
Print Reset

Printing Booklets

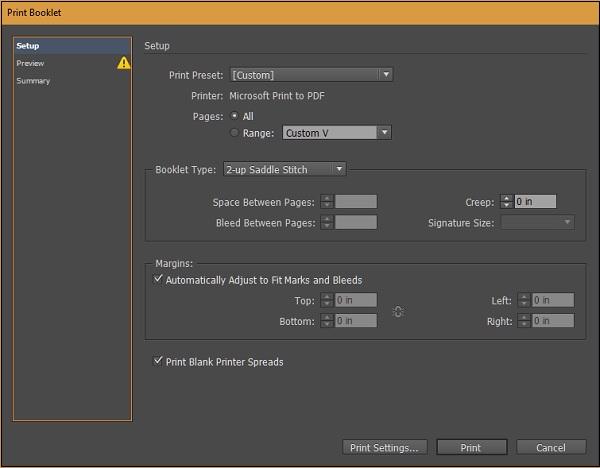
For less complex jobs like printing booklets on your own, you can use the Print Booklet… command from the File menu.
The Print Booklet… command is very useful to sample your booklet before giving it to the press so that you can have a real idea of how it would look on paper.
Print Booklet
There are however, a few caveats to using this feature. The first thing to remember is that Print Booklet always prints the 1st and last page on one spread, followed by the 2nd and last but one and so on until all the pages are printed. This is because of how the booklet will fold when you stitch it. The other important caveat to remember is the number of pages in the document should be divisible by 4 (you can fold a paper in half to understand why).
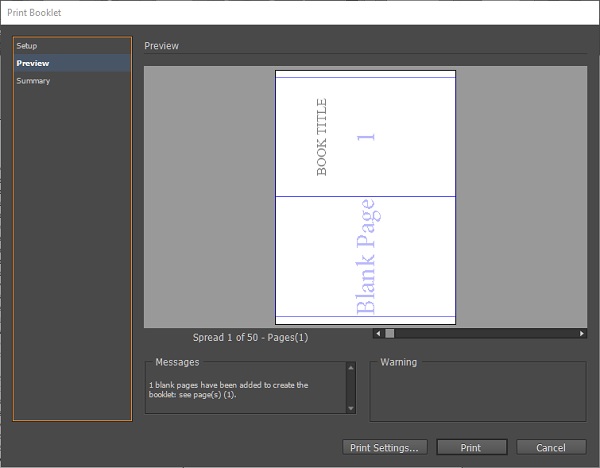
You can leave most of the options in the Print Booklet dialog box as defaults. However more often than not, you will find a yellow exclamation near the Preview page indicating that something is wrong; most probably the page will not be fitting inside the booklet.
To rectify this, simply select the Preview page, go to Print Settings… and in the Print Settings dialog box, adjust the settings in the Setup group to make the content scales to the page and click OK to return to the Preview page in the Print Booklet dialog box. You will notice that the yellow exclamation is gone and the document has correctly fit into the page.
Print Preview
You will also notice that InDesign adds extra blank pages if you have excess or less number of pages that are divisible by 4 to ensure that the booklet format is printed properly. You will also notice page number watermarks are on in the preview. These are just for indication and will not be printed on the final booklet. Click Print to print the booklet.

Adobe InDesign CC - Package Documents

We have seen how InDesign links images and objects into the document instead of embedding them directly. This works well most of the time till you want to share the document, say, with your printing press. Most of the time, they will not be having access to your image assets or fonts and might get linking errors or missing font errors.
In order to avoid these hassles, InDesign provides a way for you to package the document. The packaged document contains all the required assets, fonts, and also instructions to the printing press in one folder along with the .inddfile.
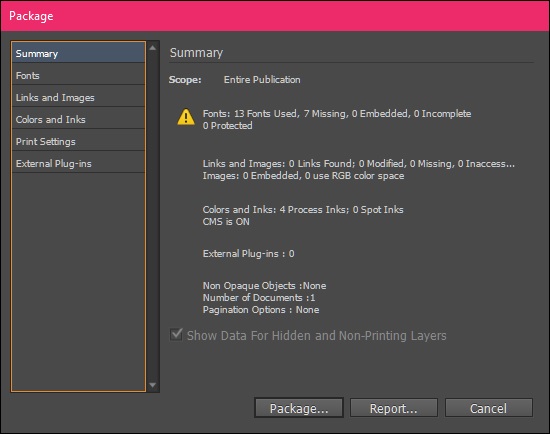
Package Summary
To prepare a document for packaging, open the document, do the required preflighting and go to the File menu and select Package… This will open the Package dialog box.
The Package dialog box shows a summary of various components of the documents and any of the errors it has found. You can export the reports if you wish by clicking Report… and saving it as a text file. If not, you can simply select the Package… option and select a file name and location for the document on your hard drive. This is not the actual packaging yet.
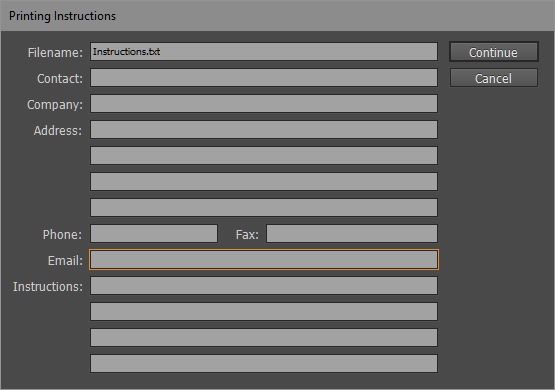
Once you save the package, you will get the Printing Instructions dialog box where you can give your contact information and any instructions you want to tell the printing press.
Most printing presses ignore this information, unless you specify to look at it. It is always better to have a correspondence with the press either by phone or email instead of using the Printing Instructions dialog box. Click Continuewhen done and give a location for the package.
Printing Instructions
You might get a warning box about the use of copyrighted fonts. Be careful when you package fonts that you have purchased separately as they come with usage and distribution restrictions. Click OK to continue.
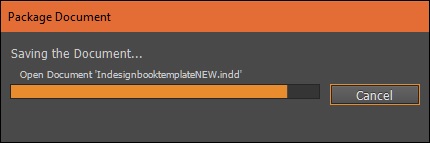
InDesign will show the progress of the packaging. Once it is completed, you will be able to find the package along with the instructions file in the destination you have selected.
Selected Designation

Adobe InDesign CC - Preflighting

Preflighting is the process of ensuring that all aspects of the document are perfect before going to print. InDesign constantly preflights the documents every time you work with them.

Viewing Preflight Errors

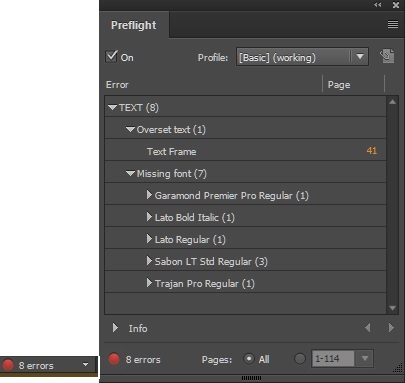
The above document shows it has 8 errors in the status bar. Double-clicking this message in the status bar will open the Preflight panel, which lists all the errors that InDesign has found. You can directly jump to the page in which the error has been discovered. Once all the errors are corrected, the red error light changes to green, indicating, No errors.
Viewing Preflighting Errors

Changing Preflight Profiles

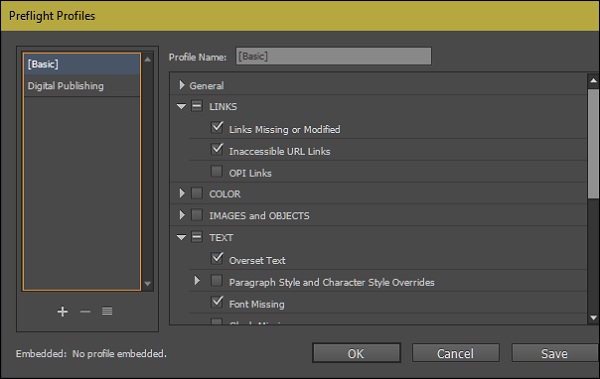
It is possible to define your own preflight profile so that you get to determine the errors you should be alerted to. To do this, go to the Define Profiles…option in the Preflight panel menu to open the Preflight Profiles dialog box. InDesign ships with two built-in preflight profiles – Basic and Desktop Publishing with the option of adding your own profiles. You can choose the errors that InDesign should look for when preflighting the document. Remember that the Basic profile cannot be edited.
Preflight Profile

Adobe InDesign CC - Ebook

The EPUB format is the standard format for publishing eBooks which can be read on a variety of mobile devices. If you want your book to have a wide audience, you should definitely consider publishing it in the EPUB format. InDesign allows you to directly export the book as an EPUB. Creating EPUBs from InDesign is actually a complex process but we will cover the basics here to get you started.
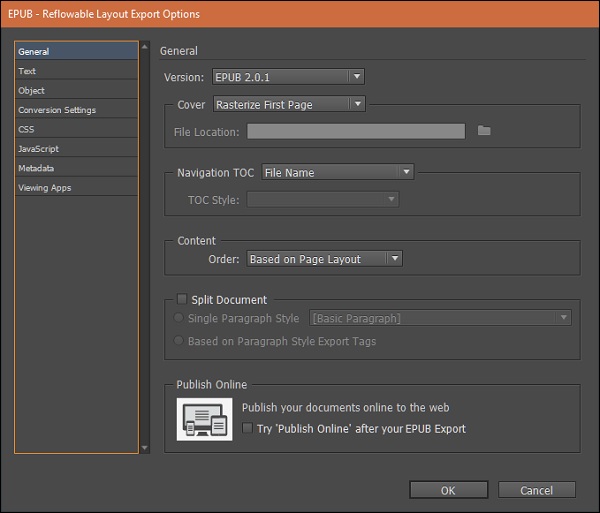
EPUB General Options
To export the file, go to the File menu, click Export and choose the Save as type as EPUB (Fixed Layout). This will open the EPUB export options dialog box. You can directly click OK, if you don’t want to change the options. But doing so, might not give you the document with the correct layout.
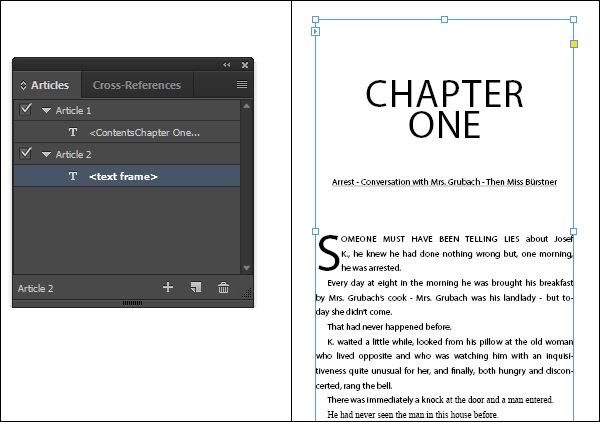
To get the most accurate layout possible for your EPUB, you need to let InDesign know the sequence of your content. To do this, go to the Windowmenu and select Articles to open the Articles panel. Here, click the Create New Article button to add an article.
Now, use the Selection tool to drag a frame onto this created article. You can also select a frame using the Selection tool and click on the + symbol in the Articles panel.
Article Panel
Once you’ve added all the articles, go back to the EPUB export options and now select Same as Articles Panel in Order dropdown menu in the Contentsection. This will make sure that InDesign follows the exact same order you have specified in the Articles panel. Click OK to export the document and view in your default EPUB reader.
If you do not have an EPUB reader installed, you can download one from Adobe called Adobe Digital Editions from http://labs.adobe.com

Adobe InDesign CC - Interactive Documents

InDesign makes it easy to add hyperlinks and bookmarks to make your document interactive. However, keep in mind that the interactivity you add will not be evident in the InDesign workspace but will be seen in the exported PDF. We will discuss a few interactive elements in this chapter. It makes sense to set the workspace from Advanced to Interactive for PDF to enable easy access to interactive panels.

Adding URL Hyperlinks

It is very easy to add URL hyperlinks to any object in InDesign. You can add hyperlinks to an object so that clicking the object in the PDF will take the user to the website or you can add hyperlinks to text to get the same result.
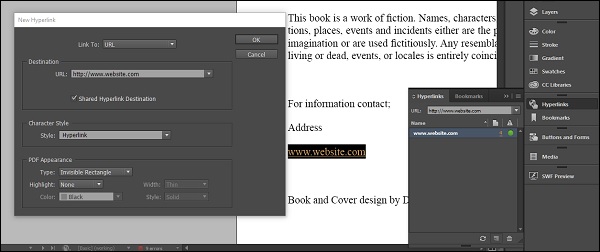
In the following example, we have selected the text to point to a hyperlink. Go to the Hyperlink panel and click the Create new hyperlink at the bottom of the panel to open the New Hyperlink dialog box.
New Hyperlink
Make sure the Link To field is set to URL. Type the URL in the URL field and click OK. InDesign now creates the URL for the text selected. Whenever you export this as a PDF and click the text, it will open the URL in your default web browser.

Hyperlinking a Page

Similar to hyperlinking a URL, it is also possible to hyperlink an object or text to a specific page in the document. Clicking the text or object will take the user to the linked page.
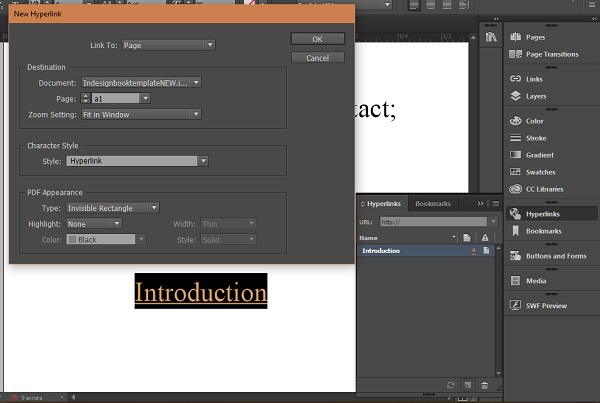
In the following example, let us consider a text called Introduction, clicking which we want the user to go to Chapter 1. Select the text and click the Create new hyperlink at the bottom of the panel to open the New Hyperlink dialog box.
This time, instead of the URL, select Page in the Link To dropdown menu. We know Chapter 1 of this book starts from page a1, so in the Page dropdown menu, select a1. We want the contents of the chapter to zoom to fit inside window, so we will select Fit in Window in the Zoom Setting. Click OK to add the hyperlink to the document.
Now, whenever this is exported as a PDF, any user who clicks on the Introduction text will go directly to Chapter 1.
Linking Page

Adding Bookmarks

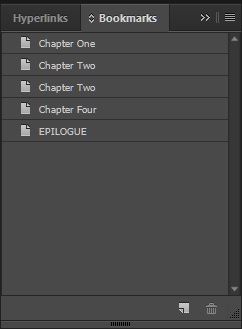
Bookmarks are also hyperlinks which make it easier for the user to navigate the document. You can create a bookmark for every page or simply create a ToC to insert bookmarks. Bookmarks are automatically created when you insert a ToC.
Adding Bookmarks
In this example, we have already created the ToC from the earlier chapter. You can access the bookmarks from the Bookmarks panel present in the same Hyperlinks panel.

Exporting Interactive Documents

As discussed in the beginning of this chapter, you cannot view the interactivity within the actual InDesign workspace. You have to export it as a PDF. There are several options available when you export it as a PDF.
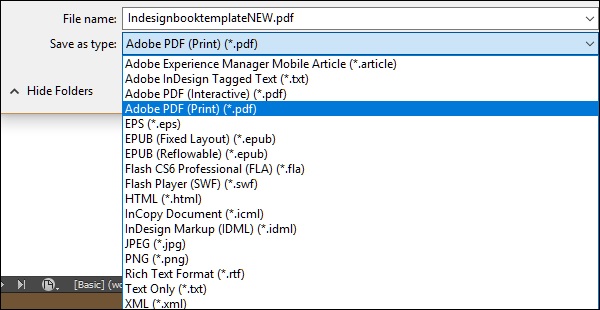
To export a document as a PDF, go to the File menu, then click on Export… If you notice, among the various export formats available, there are two Adobe PDF export options – one is the Adobe PDF (Interactive) and the other is Adobe PDF (Print).
For all intents and purposes, you need to select the Adobe PDF (Print) unless you have multimedia content such as movies or audio in the document. Click Save. This will open the Export Adobe PDF dialog box.
Exporting PDF
There are a lot of settings to get the exact PDF output you want but just make sure to set the Compatibility to Acrobat 6 (PDF 1.5) or higher.
In the Include section, make sure Bookmarks and Hyperlinks checkboxes are turned on. You can also turn on the View PDF after Exporting in the Optionssection to open the PDF in your PDF viewer after export.

Adobe InDesign CC - Table of Contents

The Table of Contents (ToC) is a very useful feature in InDesign not just to create a chapter-wise ToC, but also to list out basically anything that has a paragraph style.
Table Content
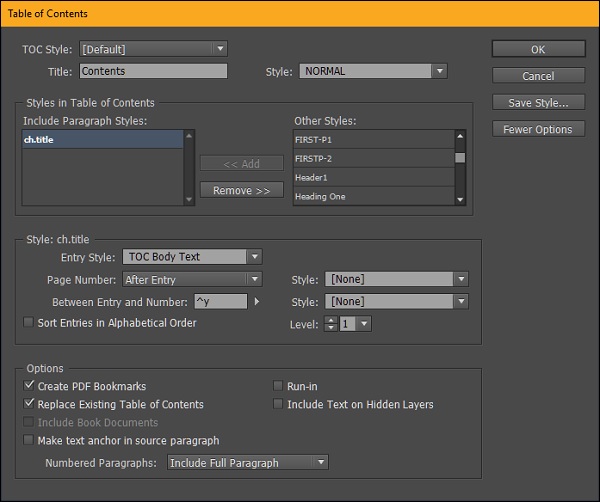
To access the ToC options, go to the Layout menu and select Table of Contents… to open the Table of Contents dialog box. You might need to click More Options to reveal additional options in the dialog box.
Table Content Option
There are a lot of options in here but the most important thing is to add the paragraph style that resembles the chapter headings. In the above example, we have selected the ch.title from the Other Styles area and pressed the <<Add button to add the style to the Include Paragraph Styles area.
Next, define the entry style by selecting the appropriate style for your ToC in the Entry Style dropdown menu. The entry style defines how the ToC labels look like. If you don’t define the entry style, you will be having the original paragraph style in your ToC, which might not look good.
Select the After Entry option in the Page Number dropdown menu to keep the page numbers after the chapter entry. You also need to specify the code between the chapter entry and the page number. The Right Indent Tab is specified by the code ^y. If you don’t know the code, you can click the small right arrow beside the Between Entry and Number box. The Right Indent Tabensures that the page numbers align perfectly at the end of the right side of the text frame.
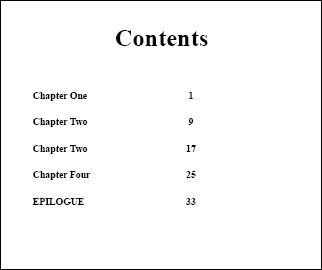
Review the options and click OK to see the ToC. The above example shows a very basic ToC. You can of course go ahead and customize the paragraph styles that you want as discussed earlier and use them in the ToC to get all sorts of custom ToCs.

Adobe InDesign CC - Long Documents

It is always easier to break a long document which often runs into several hundred pages into smaller chunks that are individual InDesign documents (file extension .indd) that can be easily managed. How many chunks you break is entirely up to your liking.
Break Long Document
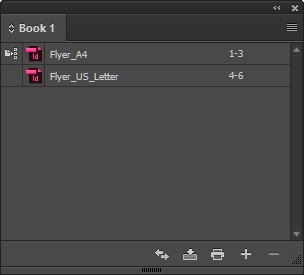
You can combine all these individual InDesign documents into an InDesign book (file extension. indb). To create a book, open the File menu, go to the New submenu and select Book… This will open the Save dialog box and ask you to save the book file. Give it a name and click OK. This will create the book and open the Book panel.
Save Document
In the following example, we have taken two .indd files. However, you can choose any number of files by clicking the + symbol at the bottom of the panel. Once all the .indd files are added, you will see that the page numbers are made continuous.
Added Indd Files
The icon next to the first document in the Book panel indicates the style source. It means, this document is a source for whatever paragraph or character style changes that you make. You can select any document as a style source.
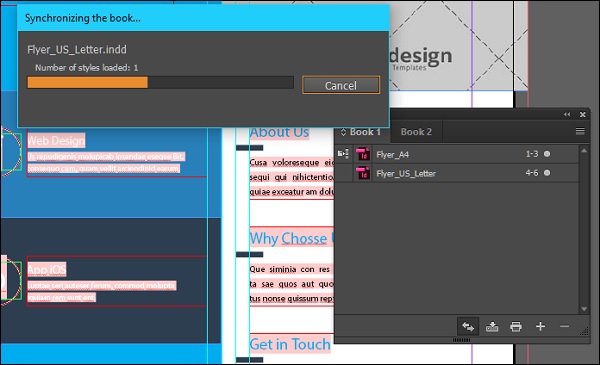
The best part about using the Book panel is that this style source can be synchronized with all other documents in the panel by clicking the double arrow icon in the bottom of the panel. This will tell InDesign to look for style elements in the first document and implement them in the subsequent documents.
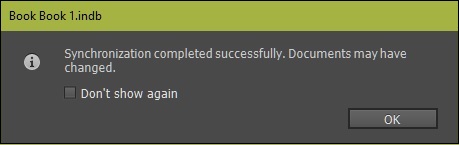
You will get a confirmation once the synchronization is complete.

Adobe InDesign CC - Tables

InDesign provides several ways of working with tables. You can create a table from scratch within a text frame or convert an existing data into a table. Note that the table created will be an anchored object for the text frame.

Creating a New Table

To create a new table, simply select the Text tool and draw an area that you want to create as a table.
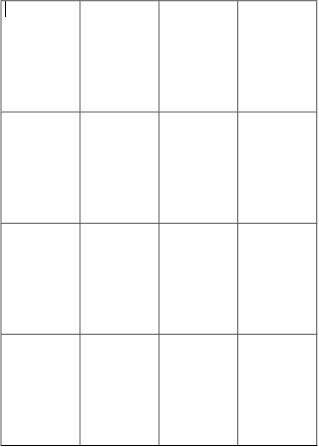
Create Table
Then go to the Tables menu and select Create Table… to open the Create Table dialog box. Here, you can specify the number of rows and columns that you want in your table and also specify if you need headers and footers for the table. Clicking OK will create the table within your text frame.
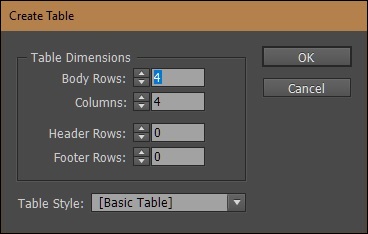
Create Table Dialog Box
You can now enter data within this table. Moving the cursor over any of the rows or columns will allow you to resize the row or column. Use Shift and drag outside of the table to adjust the entire table proportionally.
Remember that to drag the rows or columns, you need the Type tool selected on the toolbar as the table is considered to be a text frame. If you use the Selection tool, it will move the whole text frame instead of just the row or column.
To delete the table, simply drag over the table and press Delete on your keyboard.

Creating a Table from Existing Data

Most of the time, it makes sense to convert an existing data into a table. You can import a Word, Excel, Access (database) file, or even a text document and convert the contents into a table.
Use the Text tool to create the text frame for your table. Then, use the Placecommand to place your data into the text frame.
In the following example, we will use a simple text file containing information about websites of some pharma companies and convert this into a table.
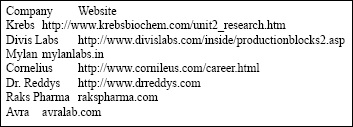
Pharma Companies
Select all the contents of the text frame by clicking the text and pressing Ctrl+A on Windows or Command+A on the Mac. Go to the Table menu and select the Convert Text to Table… option to open the Convert Text to Table dialog box.
You need to tell InDesign what it should consider as a row and column separator. For now, the defaults will work. Click OK to create the table.
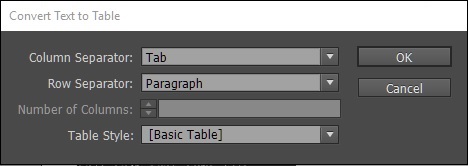
Convert Text to Tables
We see that InDesign has created a table with the given data.
CompanyWebsite
Krebshttp://www.krebsbiochem.com/unit2_research.htm
Divis Labshttp://www.divislabs.com/inside/productionblock2.asp
Mylanmylanlabs.in
Corneliushttp://www.cornileus.com/career.html
Dr.Reddyshttp://www.dreddys.com
Raks Pharmarakspharma.com
Avraavralab.com
You can edit the contents of each cell just like how you would edit a regular text frame. If you want an even distribution of rows and columns, you can simply select the rows or columns and go to the Table menu and select either Distribute Rows Evenly or Distribute Columns Evenly or both.

Formatting Tables

InDesign gives plenty of options to format the layout of the table.
All table formatting options are accessible from the Table Options dialog box. To access this, simply go to the Table menu, then go to the Table Optionssubmenu and choose Table Setup…
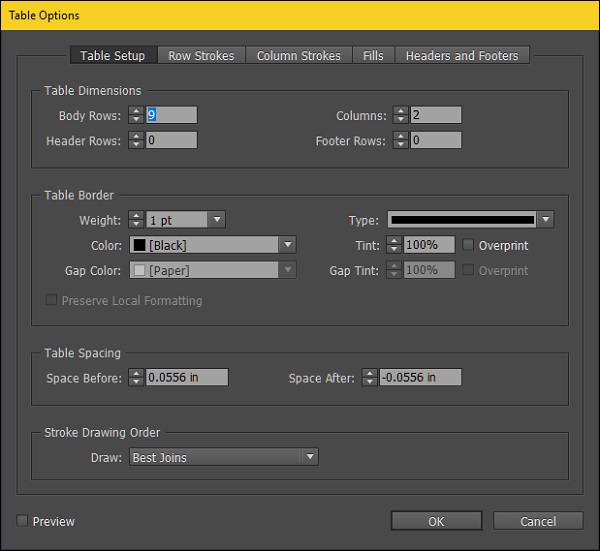
Formatting Tables
From here, you can choose how your borders should look like and what should be their stroke, how you want individual rows and columns to be colored and a whole lot more. It is easy to explore the options and change the necessary settings.
For this example, let us see the final output after doing some basic formatting. Before doing this, it would be a good practice to define the first row of the table as the header. To do this, go to the Table menu, then to the Convert Rows submenu and select, To Header. This is useful when you have a table spanning multiple pages and it helps to have the header on all the pages for easy reference.
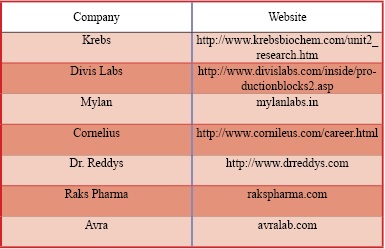
Well Formatted Table
Now, we have a table that is reasonably well formatted. You can explore further options in the Table Options dialog box to adjust the formatting to your liking.
AJAX - Quick Guide