Showing posts with label Firebase. Show all posts

Thursday, August 23, 2018

Firebase - Deploying

In this chapter, we will show you how to host your app on the Firebase server.
Before we begin, let us just add some text to index.html body tag. In this example, we will add the following text.
<h1>WELCOME TO FIREBASE TUTORIALS APP</h1>

Step 1 - Install Firebase Tools

We need to install firebase tools globally in the command prompt window.
npm install -g firebase-tools

Step 2 - Initialize the Firebase App

First we need to login to Firebase in the command prompt.
firebase login
Open the root folder of your app in the command prompt and run the following command.
firebase init
This command will initialize your app.
NOTE − If you have used a default configuration, the public folder will be created and the index.html inside this folder will be the starting point of your app. You can copy your app file inside the public folder as a workaround.

Step 3 - Deploy Firebase App

This is the last step in this chapter. Run the following command from the command prompt to deploy your app.
firebase deploy
After this step, the console will log your apps Firebase URL. In our case, it is called https://tutorialsfirebase.firebaseapp.com. We can run this link in the browser to see our app.
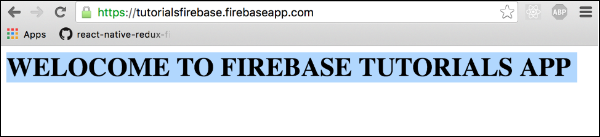
Firebase Deploying

Firebase - Security

Security in Firebase is handled by setting the JSON like object inside the security rules. Security rules can be found when we click on Database inside the side menu and then RULES in tab bar.
In this chapter, we will go through a couple of simple examples to show you how to secure the Firebase data.

Read and Write

The following code snippet defined inside the Firebase security rules will allow writing access to /users/'$uid'/ for the authenticated user with the same uid, but everyone could read it.

Example

Let us consider the following example.
{
   "rules": {
      "users": {
         
         "$uid": {
            ".write": "$uid === auth.uid",
            ".read": true
         }
         
      }
   }
}

Validate

We can enforce data to string by using the following example.

Example

{
   "rules": {
      
      "foo": {
         ".validate": "newData.isString()"
      }
      
   }
}
This chapter only grabbed the surface of Firebase security rules. The important thing is to understand how these rules work, so you can combine it inside the app.

Firebase - Offline Capabilities

In this chapter, we will show you how to handle the Firebase connection state.

Check Connection

We can check for connection value using the following code.

index.js

var connectedRef = firebase.database().ref(".info/connected");

connectedRef.on("value", function(snap) {
   if (snap.val() === true) {
      alert("connected");
   } else {
      alert("not connected");
   }
});
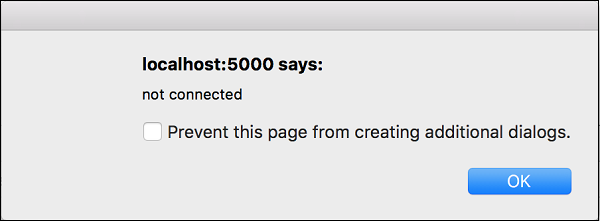
When we run the app, the pop up will inform us about the connection.
Firebase Offline Popup
By using the above given function, you can keep a track of the connection state and update your app accordingly.

Firebase - Anonymous Authentication

In this chapter, we will authenticate users anonymously.

Step 1 - Enable Anonymous Auth

This is the same process as in our earlier chapters. You need to open the Firebase dashboard, click on Auth from the side menu and SIGN-IN-METHOD inside the tab bar. You need to enable anonymous authentication.

Step 2 - Signin Function

We can use signInAnonymously() method for this authentication.

Example

Let us consider the following example.
firebase.auth().signInAnonymously()
.then(function() {
   console.log('Logged in as Anonymous!')
   
   }).catch(function(error) {
   var errorCode = error.code;
   var errorMessage = error.message;
   console.log(errorCode);
   console.log(errorMessage);
});

Firebase - Github Authentication

In this chapter, we will show you how to authenticate users using the GitHub API.

Step 1 - Enable GitHub Authentication

Open Firebase dashboard and click Auth from the side menu and then SIGN-IN-METHOD in tab bar. You need enable GitHub authentication and copy the Callback URL. You will need this in step 2. You can leave this tab open since you will need to add Client ID and Client Secret once you finish step 2.

Step 2 - Create Github App

Follow this link to create the GitHub app. You need to copy the Callback URL from Firebase into the Authorization callback URL field. Once your app is created, you need to copy the Client Key and the Client Secret from the GitHub app to Firebase.

Step 3 - Create Buttons

We will add two buttons in the body tag.

index.html

<button onclick = "githubSignin()">Github Signin</button>
<button onclick = "githubSignout()">Github Signout</button>

Step 4 - Create Auth Functions

We will create functions for signin and signout inside the index.js file.

index.js

var provider = new firebase.auth.GithubAuthProvider();

function githubSignin() {
   firebase.auth().signInWithPopup(provider)
   
   .then(function(result) {
      var token = result.credential.accessToken;
      var user = result.user;
  
      console.log(token)
      console.log(user)
   }).catch(function(error) {
      var errorCode = error.code;
      var errorMessage = error.message;
  
      console.log(error.code)
      console.log(error.message)
   });
}

function githubSignout(){
   firebase.auth().signOut()
   
   .then(function() {
      console.log('Signout successful!')
   }, function(error) {
      console.log('Signout failed')
   });
}
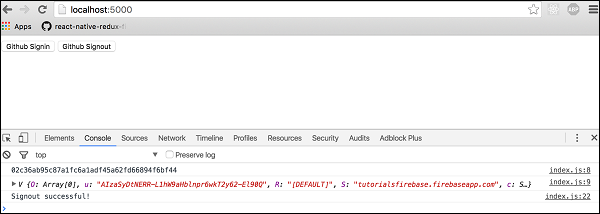
Now we can click on buttons to trigger authentication. Console will show that the authentication is successful.
Firebase Github Auth Log

Firebase - Twitter Authentication

In this chapter, we will explain how to use Twitter authentication.

Step 1 - Create Twitter App

You can create Twitter app on this link. Once your app is created click on Keys and Access Tokens where you can find API Key and API Secret. You will need this in step 2.

Step 2 - Enable Twitter Authentication

In your Firebase dashboard side menu, you need to click Auth. Then open SIGN-IN-METHOD tab. Click on Twitter to enable it. You need to add API Key and API Secret from the step 1.
Then you would need to copy the callback URL and paste it in your Twitter app. You can find the Callback URL of your Twitter app when you click on the Settings tab.

Step 3 - Add Buttons

In this step, we will add two buttons inside the body tag of index.html.

index.html

<button onclick = "twitterSignin()">Twitter Signin</button>
<button onclick = "twitterSignout()">Twitter Signout</button>

Step 4 - Authentication Functions

Now we can create functions for Twitter authentication.

index.js

var provider = new firebase.auth.TwitterAuthProvider();

function twitterSignin() {
   firebase.auth().signInWithPopup(provider)
    
  .then(function(result) {
      var token = result.credential.accessToken;
      var user = result.user;
  
      console.log(token)
      console.log(user)
   }).catch(function(error) {
      console.log(error.code)
      console.log(error.message)
   });
}

function twitterSignout() {
   firebase.auth().signOut()
   
   .then(function() {
      console.log('Signout successful!')
   }, function(error) {
      console.log('Signout failed!')
   });
}
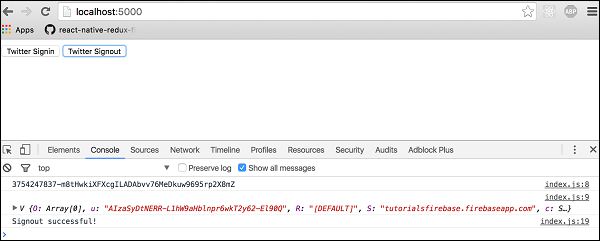
When we start our app, we can sigin or signout by clicking the two buttons. The console will confirm that the authentication is successful.
Firebase Twitter Auth Log

Firebase - Facebook Authentication

In this chapter, we will authenticate users with Firebase Facebook authentication.

Step 1 - Enable Facebook Auth

We need to open Firebase dashboard and click Auth in side menu. Next, we need to choose SIGN-IN-METHOD in tab bar. We will enable Facebook auth and leave this open since we need to add App ID and App Secret when we finish step 2.

Step 2 - Create Facebook App

To enable Facebook authentication, we need to create the Facebook app. Click on this link to start. Once the app is created, we need to copy App ID and App Secret to the Firebase page, which we left open in step 1. We also need to copy OAuth Redirect URI from this window into the Facebook app. You can find + Add Product inside side menu of the Facebook app dashboard.
Choose Facebook Login and it will appear in the side menu. You will find input field Valid OAuth redirect URIs where you need to copy the OAuth Redirect URI from Firebase.

Step 3 - Connect to Facebook SDK

Copy the following code at the beginning of the body tag in index.html. Be sure to replace the 'APP_ID' to your app id from Facebook dashboard.

Example

Let us consider the following example.
<script>
   window.fbAsyncInit = function() {
      FB.init ({
         appId      : 'APP_ID',
         xfbml      : true,
         version    : 'v2.6'
      });
   };

   (function(d, s, id) {
      var js, fjs = d.getElementsByTagName(s)[0];
      if (d.getElementById(id)) {return;}
      js = d.createElement(s); js.id = id;
      js.src = "//connect.facebook.net/en_US/sdk.js";
      fjs.parentNode.insertBefore(js, fjs);
   } (document, 'script', 'facebook-jssdk'));
 
</script>

Step 4 - Create Buttons

We set everything in first three steps, now we can create two buttons for login and logout.

index.html

<button onclick = "facebookSignin()">Facebook Signin</button>
<button onclick = "facebookSignout()">Facebook Signout</button>

Step 5 - Create Auth Functions

This is the last step. Open index.js and copy the following code.

index.js

var provider = new firebase.auth.FacebookAuthProvider();

function facebookSignin() {
   firebase.auth().signInWithPopup(provider)
   
   .then(function(result) {
      var token = result.credential.accessToken;
      var user = result.user;
  
      console.log(token)
      console.log(user)
   }).catch(function(error) {
      console.log(error.code);
      console.log(error.message);
   });
}

function facebookSignout() {
   firebase.auth().signOut()
   
   .then(function() {
      console.log('Signout successful!')
   }, function(error) {
      console.log('Signout failed')
   });
}

Firebase - Google Authentication

In this chapter, we will show you how to set up Google authentication in Firebase.

Step 1 - Enable Google Authentication

Open Firebase dashboard and click Auth on the left side menu. To open the list of available methods, you need to click on SIGN_IN_METHODS in the tab menu.
Now you can choose Google from the list, enable it and save it.

Step 2 - Create Buttons

Inside our index.html, we will add two buttons.

index.html

<button onclick = "googleSignin()">Google Signin</button>
<button onclick = "googleSignout()">Google Signout</button>

Step 3 - Signin and Signout

In this step, we will create Signin and Signout functions. We will use signInWithPopup() and signOut() methods.

Example

Let us consider the following example.
var provider = new firebase.auth.GoogleAuthProvider();

function googleSignin() {
   firebase.auth()
   
   .signInWithPopup(provider).then(function(result) {
      var token = result.credential.accessToken;
      var user = result.user;
  
      console.log(token)
      console.log(user)
   }).catch(function(error) {
      var errorCode = error.code;
      var errorMessage = error.message;
  
      console.log(error.code)
      console.log(error.message)
   });
}

function googleSignout() {
   firebase.auth().signOut()
 
   .then(function() {
      console.log('Signout Succesfull')
   }, function(error) {
      console.log('Signout Failed')  
   });
}
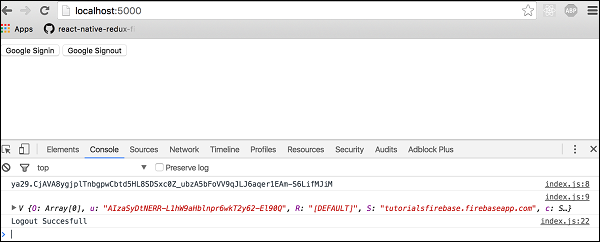
After we refresh the page, we can click on the Google Signin button to trigger the Google popup. If signing in is successful, the developer console will log in our user.
We can also click on the Google Signout button to logout from the app. The console will confirm that the logout was successful.
Firebase Google Auth Log

AJAX - Quick Guide