Wednesday, August 29, 2018

AJAX - Quick Guide

What is AJAX?

AJAX stands for Asynchronous JavaScript and XML. AJAX is a new technique for creating better, faster, and more interactive web applications with the help of XML, HTML, CSS, and Java Script.

AJAX - Useful Resources

The following resources contain additional information on AJAX. Please use them to get more in-depth knowledge on this topic.

Useful Links on AJAX

AJAX - Current Issues

AJAX is growing very fast and that is the reason that it contains many issues with it. We hope with the passes of time, they will be resolved and AJAX will become ideal for web applications. We are listing down a few issues that AJAX currently suffers from.
Complexity is increased
  • Server-side developers will need to understand that presentation logic will be required in the HTML client pages as well as in the server-side logic.
  • Page developers must have JavaScript technology skills.

AJAX - Security

AJAX Security: Server Side

  • AJAX-based Web applications use the same server-side security schemes of regular Web applications.
  • You specify authentication, authorization, and data protection requirements in your web.xml file (declarative) or in your program (programmatic).
  • AJAX-based Web applications are subject to the same security threats as regular Web applications.

AJAX Security: Client Side

  • JavaScript code is visible to a user/hacker. Hacker can use JavaScript code for inferring server-side weaknesses.
  • JavaScript code is downloaded from the server and executed ("eval") at the client and can compromise the client by mal-intended code.
  • Downloaded JavaScript code is constrained by the sand-box security model and can be relaxed for signed JavaScript.

AJAX - Database Operations

To clearly illustrate how easy it is to access information from a database using AJAX, we are going to build MySQL queries on the fly and display the results on "ajax.html". But before we proceed, let us do the ground work. Create a table using the following command.
NOTE − We are assuming you have sufficient privilege to perform the following MySQL operations.
CREATE TABLE 'ajax_example' (
   'name' varchar(50) NOT NULL,
   'age' int(11) NOT NULL,
   'sex' varchar(1) NOT NULL,
   'wpm' int(11) NOT NULL,
   PRIMARY KEY  ('name')
) 

AJAX - XMLHttpRequest

The XMLHttpRequest object is the key to AJAX. It has been available ever since Internet Explorer 5.5 was released in July 2000, but was not fully discovered until AJAX and Web 2.0 in 2005 became popular.
XMLHttpRequest (XHR) is an API that can be used by JavaScript, JScript, VBScript, and other web browser scripting languages to transfer and manipulate XML data to and from a webserver using HTTP, establishing an independent connection channel between a webpage's Client-Side and Server-Side.
The data returned from XMLHttpRequest calls will often be provided by back-end databases. Besides XML, XMLHttpRequest can be used to fetch data in other formats, e.g. JSON or even plain text.

AJAX - Action

This chapter gives you a clear picture of the exact steps of AJAX operation.

Steps of AJAX Operation

  • A client event occurs.
  • An XMLHttpRequest object is created.
  • The XMLHttpRequest object is configured.
  • The XMLHttpRequest object makes an asynchronous request to the Webserver.
  • The Webserver returns the result containing XML document.
  • The XMLHttpRequest object calls the callback() function and processes the result.
  • The HTML DOM is updated.
Let us take these steps one by one.

AJAX - Browser Support

All the available browsers cannot support AJAX. Here is a list of major browsers that support AJAX.
  • Mozilla Firefox 1.0 and above.
  • Netscape version 7.1 and above.
  • Apple Safari 1.2 and above.
  • Microsoft Internet Explorer 5 and above.
  • Konqueror.
  • Opera 7.6 and above.
When you write your next application, do consider the browsers that do not support AJAX.
NOTE − When we say that a browser does not support AJAX, it simply means that the browser does not support the creation of Javascript object – XMLHttpRequest object.

Writing Browser Specific Code

The simplest way to make your source code compatible with a browser is to use try...catch blocks in your JavaScript.
<html>
   <body>
      <script language = "javascript" type = "text/javascript">
         <!-- 
         //Browser Support Code
         function ajaxFunction() {
            var ajaxRequest;  // The variable that makes Ajax possible!

            try {
               // Opera 8.0+, Firefox, Safari 
               ajaxRequest = new XMLHttpRequest();
            } catch (e) {

               // Internet Explorer Browsers
               try {
                  ajaxRequest = new ActiveXObject("Msxml2.XMLHTTP");
               } catch (e) {
                  
                  try {
                     ajaxRequest = new ActiveXObject("Microsoft.XMLHTTP");
                  } catch (e) {

                     // Something went wrong
                     alert("Your browser broke!");
                     return false;
                  }
               }
            }
         }
         //-->
      </script>
      
      <form name = 'myForm'>
         Name: <input type = 'text' name = 'username' /> <br />
         Time: <input type = 'text' name = 'time' />
      </form>
      
   </body>
</html>
In the above JavaScript code, we try three times to make our XMLHttpRequest object. Our first attempt −
  • ajaxRequest = new XMLHttpRequest();
It is for Opera 8.0+, Firefox, and Safari browsers. If it fails, we try two more times to make the correct object for an Internet Explorer browser with −
  • ajaxRequest = new ActiveXObject("Msxml2.XMLHTTP");
  • ajaxRequest = new ActiveXObject("Microsoft.XMLHTTP");
If it doesn't work, then we can use a very outdated browser that doesn't support XMLHttpRequest, which also means it doesn't support AJAX.
Most likely though, our variable ajaxRequest will now be set to whatever XMLHttpRequest standard the browser uses and we can start sending data to the server. The step-wise AJAX workflow is explained in the next chapter.

AJAX - Examples

Here is a list of some famous web applications that make use of AJAX.

Google Maps

A user can drag an entire map by using the mouse, rather than clicking on a button.

Google Suggest

As you type, Google offers suggestions. Use the arrow keys to navigate the results.

Gmail

Gmail is a webmail built on the idea that emails can be more intuitive, efficient, and useful.

Yahoo Maps (new)

Now it's even easier and more fun to get where you're going!

Difference between AJAX and Conventional CGI Program

Try these two examples one by one and you will feel the difference. While trying AJAX example, there is no discontinuity and you get the response very quickly, but when you try the standard GCI example, you would have to wait for the response and your page also gets refreshed.

AJAX Example

 *  =  

Standard Example

 *  =  
NOTE − We have given a more complex example in AJAX Database.

AJAX - Technologies

AJAX cannot work independently. It is used in combination with other technologies to create interactive webpages.

JavaScript

  • Loosely typed scripting language.
  • JavaScript function is called when an event occurs in a page.
  • Glue for the whole AJAX operation.

DOM

  • API for accessing and manipulating structured documents.
  • Represents the structure of XML and HTML documents.

CSS

  • Allows for a clear separation of the presentation style from the content and may be changed programmatically by JavaScript

XMLHttpRequest

  • JavaScript object that performs asynchronous interaction with the server.

What is AJAX?

AJAX stands for Asynchronous JavaScript and XML. AJAX is a new technique for creating better, faster, and more interactive web applications with the help of XML, HTML, CSS, and Java Script.
  • Ajax uses XHTML for content, CSS for presentation, along with Document Object Model and JavaScript for dynamic content display.
  • Conventional web applications transmit information to and from the sever using synchronous requests. It means you fill out a form, hit submit, and get directed to a new page with new information from the server.
  • With AJAX, when you hit submit, JavaScript will make a request to the server, interpret the results, and update the current screen. In the purest sense, the user would never know that anything was even transmitted to the server.
  • XML is commonly used as the format for receiving server data, although any format, including plain text, can be used.
  • AJAX is a web browser technology independent of web server software.
  • A user can continue to use the application while the client program requests information from the server in the background.
  • Intuitive and natural user interaction. Clicking is not required, mouse movement is a sufficient event trigger.
  • Data-driven as opposed to page-driven.

Rich Internet Application Technology

AJAX is the most viable Rich Internet Application (RIA) technology so far. It is getting tremendous industry momentum and several tool kit and frameworks are emerging. But at the same time, AJAX has browser incompatibility and it is supported by JavaScript, which is hard to maintain and debug.

AJAX is Based on Open Standards

AJAX is based on the following open standards −
  • Browser-based presentation using HTML and Cascading Style Sheets (CSS).
  • Data is stored in XML format and fetched from the server.
  • Behind-the-scenes data fetches using XMLHttpRequest objects in the browser.
  • JavaScript to make everything happen.

Thursday, August 23, 2018

Firebase - Deploying

In this chapter, we will show you how to host your app on the Firebase server.
Before we begin, let us just add some text to index.html body tag. In this example, we will add the following text.
<h1>WELCOME TO FIREBASE TUTORIALS APP</h1>

Step 1 - Install Firebase Tools

We need to install firebase tools globally in the command prompt window.
npm install -g firebase-tools

Step 2 - Initialize the Firebase App

First we need to login to Firebase in the command prompt.
firebase login
Open the root folder of your app in the command prompt and run the following command.
firebase init
This command will initialize your app.
NOTE − If you have used a default configuration, the public folder will be created and the index.html inside this folder will be the starting point of your app. You can copy your app file inside the public folder as a workaround.

Step 3 - Deploy Firebase App

This is the last step in this chapter. Run the following command from the command prompt to deploy your app.
firebase deploy
After this step, the console will log your apps Firebase URL. In our case, it is called https://tutorialsfirebase.firebaseapp.com. We can run this link in the browser to see our app.
Firebase Deploying

Firebase - Security

Security in Firebase is handled by setting the JSON like object inside the security rules. Security rules can be found when we click on Database inside the side menu and then RULES in tab bar.
In this chapter, we will go through a couple of simple examples to show you how to secure the Firebase data.

Read and Write

The following code snippet defined inside the Firebase security rules will allow writing access to /users/'$uid'/ for the authenticated user with the same uid, but everyone could read it.

Example

Let us consider the following example.
{
   "rules": {
      "users": {
         
         "$uid": {
            ".write": "$uid === auth.uid",
            ".read": true
         }
         
      }
   }
}

Validate

We can enforce data to string by using the following example.

Example

{
   "rules": {
      
      "foo": {
         ".validate": "newData.isString()"
      }
      
   }
}
This chapter only grabbed the surface of Firebase security rules. The important thing is to understand how these rules work, so you can combine it inside the app.

Firebase - Offline Capabilities

In this chapter, we will show you how to handle the Firebase connection state.

Check Connection

We can check for connection value using the following code.

index.js

var connectedRef = firebase.database().ref(".info/connected");

connectedRef.on("value", function(snap) {
   if (snap.val() === true) {
      alert("connected");
   } else {
      alert("not connected");
   }
});
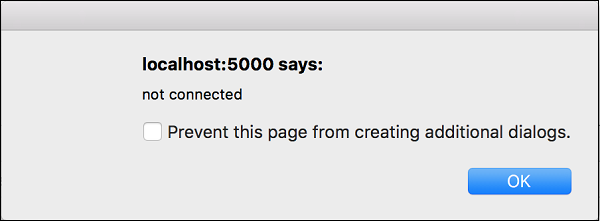
When we run the app, the pop up will inform us about the connection.
Firebase Offline Popup
By using the above given function, you can keep a track of the connection state and update your app accordingly.

Firebase - Anonymous Authentication

In this chapter, we will authenticate users anonymously.

Step 1 - Enable Anonymous Auth

This is the same process as in our earlier chapters. You need to open the Firebase dashboard, click on Auth from the side menu and SIGN-IN-METHOD inside the tab bar. You need to enable anonymous authentication.

Step 2 - Signin Function

We can use signInAnonymously() method for this authentication.

Example

Let us consider the following example.
firebase.auth().signInAnonymously()
.then(function() {
   console.log('Logged in as Anonymous!')
   
   }).catch(function(error) {
   var errorCode = error.code;
   var errorMessage = error.message;
   console.log(errorCode);
   console.log(errorMessage);
});

Firebase - Github Authentication

In this chapter, we will show you how to authenticate users using the GitHub API.

Step 1 - Enable GitHub Authentication

Open Firebase dashboard and click Auth from the side menu and then SIGN-IN-METHOD in tab bar. You need enable GitHub authentication and copy the Callback URL. You will need this in step 2. You can leave this tab open since you will need to add Client ID and Client Secret once you finish step 2.

Step 2 - Create Github App

Follow this link to create the GitHub app. You need to copy the Callback URL from Firebase into the Authorization callback URL field. Once your app is created, you need to copy the Client Key and the Client Secret from the GitHub app to Firebase.

Step 3 - Create Buttons

We will add two buttons in the body tag.

index.html

<button onclick = "githubSignin()">Github Signin</button>
<button onclick = "githubSignout()">Github Signout</button>

Step 4 - Create Auth Functions

We will create functions for signin and signout inside the index.js file.

index.js

var provider = new firebase.auth.GithubAuthProvider();

function githubSignin() {
   firebase.auth().signInWithPopup(provider)
   
   .then(function(result) {
      var token = result.credential.accessToken;
      var user = result.user;
  
      console.log(token)
      console.log(user)
   }).catch(function(error) {
      var errorCode = error.code;
      var errorMessage = error.message;
  
      console.log(error.code)
      console.log(error.message)
   });
}

function githubSignout(){
   firebase.auth().signOut()
   
   .then(function() {
      console.log('Signout successful!')
   }, function(error) {
      console.log('Signout failed')
   });
}
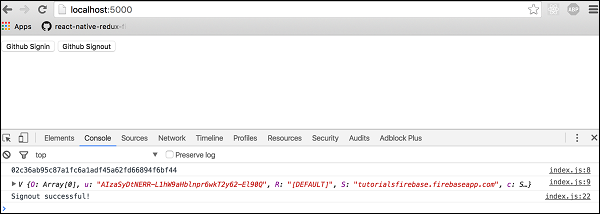
Now we can click on buttons to trigger authentication. Console will show that the authentication is successful.
Firebase Github Auth Log

AJAX - Quick Guide